DIY: Board and Batten Linear Office Wall
Board and Batten Linear Office Wall $$
Savings $1600 DIY Costs $390 (less if you already have the nail gun!!)
This project fills the space, adds texture & adds color.
Cheers to not having to buy more artwork or bookshelves and then more things to put on bookshelves.
First, let me tell you, I had to google what "Board and Batten" actually meant and honestly I'm still not really sure.
So I’ll try summarize, its trendy (classic) boards nailed on the wall in geometric shapes that look so amazing but I also shudder when I think about those boards coming down in 10 years.
A good tip, go with classic or a WOW design (are there really any others) so it can be easily painted over for future home owners or if your tastes evolve.
I always have 1000 projects going on and this one "update office" was actually way lower on the list, however when I was scouring @Pintrest for inspiration on another project and I got SUCKED IN! So quick pivot and here we are!
Our office, which is off our front door, had to be a stunner. We loved our office wall in our last home which had unique wall paper either faux shiplap or birch. It was just so unique and I knew I wanted that feeling again.
We live in new construction and currently walls are City Loft @SherwinWilliams. Due to Covid, I'm spending all my time, working from home until who knows when.
So it's about time we make this room an actual "pretty little room".
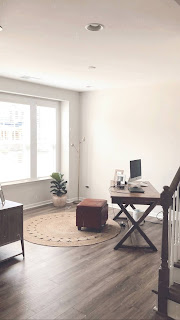
The blank slate is below!
Design Chosen inspo below from @decorlovin: it's a linear, alternating ceiling/ floor design that crosses at eye level.
LET'S DO IT!
TIPS BEFORE YOU START:
MEASURE! Space it out on paper, make sure you know how it's going to start and end, you don't want suprises. Since this design is not "centrally focus" we aimed for even spacing on both ends.
Make sure each board is perfect/straight/level/looks 100 before moving on to the next
Outlets suck! We only had to cut around 1 thankfully! I hope you have ZERO!
SUPPLIES NEEDED:
- Painters tape [optional] my husband taped, so I was just thankful
- Paint : Night Mission @Behr, similarly Moss Rock @PPG & Garden Gate @SherwinWilliams
- Paint Rollers & Handle & paint tray : please invest in a handle
- "Paint Edger" : aka @Shur-Line Trim & Touch up Pad- the best $6 you'll spend all year
- Tarp : cover up the ground, you will spill
- Liquid Nails : this is a type of caulk - keeps the wood on
- Caulk Gun : try to borrow a neighbors, $$$ starts to add up
- For 12ft celings, use 6ft & 8 ft pine, we get the nice stuff so we dont have to spend hours sanding
- (9) 8ft foot boards - you'll cut these in 1/2 to get your top row of 4ft boards
- (17) 6ft boards
- Nail gun, charger & battery : also, why are these things all sold separtely?
*or a Hammer but time consuming
- Table saw
- Finishing Nails
- Wood Filler- use at end to fill the holes & then quick coat of paint and thats it!
- "Spacer" we used a piece of wood laying around to evenly space between each board, we also measured the distance from several points to make sure it was level
*Levels work pretty nice too ;)
THE WORK:
1) Wall Prep
- Remove outlet covers & tape the wall edges
*top, bottom, left & right so you can just take that Edger and gooooooo
2) Wood Prep
- Using table saw cut the 8ft boards in 1/2 to 4ft
- Using Paint all boards x2 (you don't have to paint the back ;)
* try to lay them out in a row so you can paint multiple at once, then turn them on their sides and repeat the process a few times
3) Nail Em' Up
- Measure
* We knew where we wanted to start and end up and how many boards we had, we just made sure that the spacer we were using was optimal for the outcome
- Find your patience ;)
- We started left to right and hung in order and started with 4ft board on the top
- Using caulk gun apply liquid nails to back of wood, I used spacer, stuck on the wall
- Nail gun! 1 nail for the 4 ft boards and 2 nails for the 8ft boards
- Insert spacer to the right, then find the 8ft board and 2 nails and repeat until finish.
Isn't She Lovely?
Took about 3 days to complete and was a bit harder than I had anticipated [measure & patience].The nail gun was huge time saver!
Breakdown of Costs:
Paint $20
Pine Sanded Wood $120 _ that feels like a lot, so anyone have tips for next time w/out having to buy another tool?
Liquid Nails & Caulk Gun $10
Nail Gun, Charger & Battery & Nails $240 _investment here, but we will for sure use it again!
*we had all other supplies but buy that EDGER its like $6 bones!
rug from LC @Kohls, plant from @lowes, paint from @homedept and edger from @amazon old paint @behr edger @shurline
#photography #blog #blogging #diy #boardandbatten #budget #girlyes #budgetbabe #lifestyle
[this is without any filters, you can see its more green vs gray]


Comments
Post a Comment